

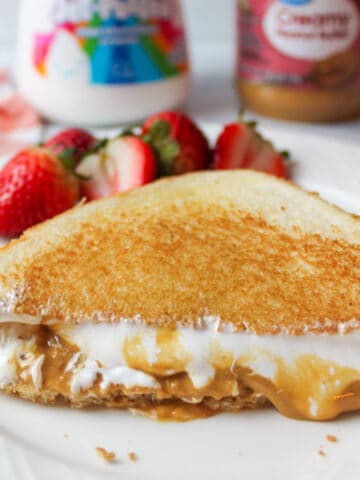
Prep today and eat tomorrow with these frozen peanut butter and jelly sandwiches. Make your favorite sandwich now and enjoy it later with these tips and tricks.

Save This Recipe to Your Inbox
By signing up, you’ll join our email list and can unsubscribe anytime.
My youngest child is obsessed with PBJs and asks for them almost daily (if not a few times a day). While I don't always give in to his requests, I do offer him his favorite sandwich for lunch whenever possible.
During the Halloween season, I opt for festive Peanut Butter Jelly Spider Sandwiches, and sometimes I switch things up with an Air Fryer Peanut Butter and Jelly, but we always come back to the classics.
In an effort to save time, I've been meal-prepping and freezing foods including Freezer Grilled Cheese, Freezer French Toast, and these Frozen Peanut Butter and Jelly Sandwiches. Making our own uncrustable sandwiches has been an excellent way to save time throughout the day and the kids love it too!
Jump to:
💛 Why You'll Love This Recipe
- The sandwiches last forever. Well, not really "forever," but you can have sandwiches last for several weeks in the freezer, so if desired you can prep a month's worth at once. This is a great way to Cut Your Grocery Bill and Still Eat Healthy.
- There's no crust. We found that thawed bread crust isn't great; it's often chewy, and the kids usually pick it off. Instead, we remove the crusts and store them in a freezer bag. These saved crusts are perfect for making Peanut Butter Jelly Bread Pudding. Plus, no more complaints about crusts from the kids!
- You can cut shapes. You don't need a sandwich cutter, but they're inexpensive and add fun to lunch. I use a mason jar lid or a round cutter; it's practical, and there's no fuss over who gets which shape.
🛒 Ingredients

Bread- You will need some sliced sandwich bread. I find that the cheaper storebought white bread works best but you can try any of your favorite varieties.
Peanut butter- We love creamy peanut butter but feel free to use any nut butter of choice.
Jelly- Use your favorite storebought or homemade jelly. We're big fans of strawberry and grape jelly like our Homemade Grape Jelly Recipe. Yum! For sugar free options consider this Sugar Free Strawberry Jam and Sugar Free Blueberry Jam.
See the recipe card below for full ingredients and instructions.
🔀 Substitutions & Variations
If you don't have a sandwich cutter or sealer, it's easy enough to DIY this frozen sandwich with a butter knife and a fork. Trim the crust and press the fork along the edges, similar to pastry or pie crust.
💰 Budget-Friendly Tips
Use store-brand ingredients. Store-brand bread, peanut butter, and jelly taste just as good once frozen and thawed, and cost significantly less.
Buy bread on sale or clearance. Soft white or wheat bread often gets marked down near its "sell by" date. It freezes beautifully, making it perfect for bulk sandwich prep.
Avoid high-end crust-removers. No need for a special cutter. Use a glass, jar lid, or plastic cup to press and seal the edges. A fork works too!
🥄 Instructions for Frozen Peanut Butter and Jelly Sandwiches
Step 1: Place a large clean cutting board in front of you and gather your items. This will streamline the process.

Step 2: Place the sliced sandwich bread on the clean work surface in front of you.

Step 3: On half of the sandwiches, top with peanut butter, you can go to the edges if desired. On the other half, spread jelly in the center (about 1-2 tablespoons). Don't leave the center of the bread as jelly makes the sandwiches hard to seal if spread too far.

Step 4: Close the sandwiches so that every peanut butter side is touching the jelly.

Step 5: Place your sandwich cutter in the center of the bread, or simply cut off the crust with a knife.

Step 6: Place any bread crusts aside in a gallon sized baggie and freeze them for future bread pudding or eat them as scraps to avoid waste.

Step 7: Grab the sandwich sealer and press down over each sandwich to seal the edges. I like to press down, flip the sandwich, and press again. If you don't have a sealer, you can use fork prongs.
Step 8: Place all of the sealed sandwiches neatly on a large baking sheet and freeze for 1-2 hours until solid then transfer to an airtight container (gallon-sized baggie or sandwich baggies) and continue to freeze for up to 3 months.
They will thaw very quickly so if you take them out the day they're needed, you can place them in a lunch box in the morning and they'll be ready by lunch or place them in the fridge overnight and they're thawed that way too.
👩🏻🍳 Expert Tips
- Crusts don't freeze well. Through trial and error, I've discovered that freezing and thawing crusts don't work well unless you plan to toast the sandwich. While a frozen PBJ thaws wonderfully, the crust tends to become chewy, leading to complaints from the kids.
- Trimming off the crust resolves this issue. Utilizing a sandwich cutter/sealer ensures consistent shapes and quality for each sandwich.
- You can also heat the sandwich. Toasting or grilling the sandwiches reduces the chewiness of the crust as the bread becomes crispier. This tip is particularly handy for Freezer Grilled Cheese or Grilled Fluffernutters, though it may not apply if you prefer untoasted PBJs.
❄️ Storage, Reheating & Make Ahead
Storage: Freeze PB&J sandwiches in an airtight container for up to 3 months or keep them in the fridge for up to 1 week. Freezing helps preserve freshness and prevents sogginess.
Reheating: No reheating needed! Simply thaw a sandwich at room temperature for 30-60 minutes or place it in a lunchbox in the morning to be ready by lunchtime.
Make Ahead: Prepare Frozen Peanut Butter and Jelly Sandwiches in bulk and freeze them solid on a baking sheet before transferring to a container. This keeps them from sticking, leaking, or getting squished.
🥗 Side Dishes or Pairing Ideas
Peanut butter and jelly sandwiches pair well with simple sides like fresh fruit or veggies. Try apple slices, bananas, grapes, carrot sticks, celery, or cucumbers for a healthy crunch. Add pretzels, popcorn, or baked chips for a salty balance, and finish with a glass of milk or a fruit smoothie.
- Instant Pot ApplesauceRecipe $4.17 / Serving $0.69
- Strawberry Cottage Cheese SaladRecipe $7.61 / Serving $0.63
- Pineapple Watermelon Banana SmoothieRecipe $2.20 / Serving $1.10
- Snickerdoodle PopcornRecipe $0.87 / Serving $0.22


❓ Recipe FAQs
Yes! This is one of the easiest sandwiches to meal prep for later and freeze.
I have made these sandwiches countless times and never had one turn out soggy, but that is always a risk if you have a moisture issue. Using natural peanut butter or too much jelly can add liquid to the sandwiches and could cause the bread to turn out soggier than expected.
At room temperature you can have your fully frozen sandwich thawed and ready to eat in about 30-60 minutes.

🍽️ More Recipes You'll Love
- Freezer Grilled CheeseRecipe $2.33 / Serving $0.39
- Spicy Tuna SandwichRecipe $3.23 / Serving $0.81
- Air Fryer Club SandwichRecipe $2.36
- Grilled Fluffernutter SandwichRecipe $1.34 / Serving $0.67
🐝 If you tried these frozen peanut butter and jelly sandwiches, please leave a ⭐️ star rating and share your buzz in the 💬 comments below. I'd truly appreciate it!
📖 Recipe

Frozen Peanut Butter and Jelly Sandwiches
Ingredients
- 6 slices sandwich bread - ($0.36)
- 4 tablespoons creamy peanut butter - ($0.20)
- 4 tablespoons jelly - ($0.40)
Instructions
- Prep workspace. Set a clean cutting board on your work surface and gather all ingredients and tools.
- Spread fillings. Lay bread slices flat. Spread peanut butter evenly on half of the slices, reaching close to the edges. Spread jelly in the center of the remaining slices, using about 1 to 2 tablespoons per slice and avoiding the edges.
- Assemble sandwiches. Close sandwiches so peanut butter sides meet the jelly sides.
- Trim. Use a sandwich cutter or knife to remove crusts if desired. Set crusts aside for bread pudding or snacks.
- Seal. Press a sandwich sealer firmly around each sandwich. Flip and press again to fully seal. A fork can be used if a sealer is not available.
- Freeze. Arrange sandwiches on a baking sheet and freeze 1 to 2 hours until solid. Transfer to an airtight container or freezer bag and freeze up to 3 months.
- Thaw. Place frozen sandwiches in a lunchbox the morning they're needed or thaw overnight in the refrigerator.
Notes
- Tools. A butter knife and fork work well if you do not have a cutter or sealer.
- Crust Texture. Freezing with crusts may cause chewiness. Toast or grill if needed.
- Storage. Freeze sealed sandwiches up to 3 months in an airtight container or refrigerate up to 1 week.
Nutritional Information
Save This Recipe to Your Inbox
By signing up, you'll join our email list and can unsubscribe anytime.


Comments
No Comments