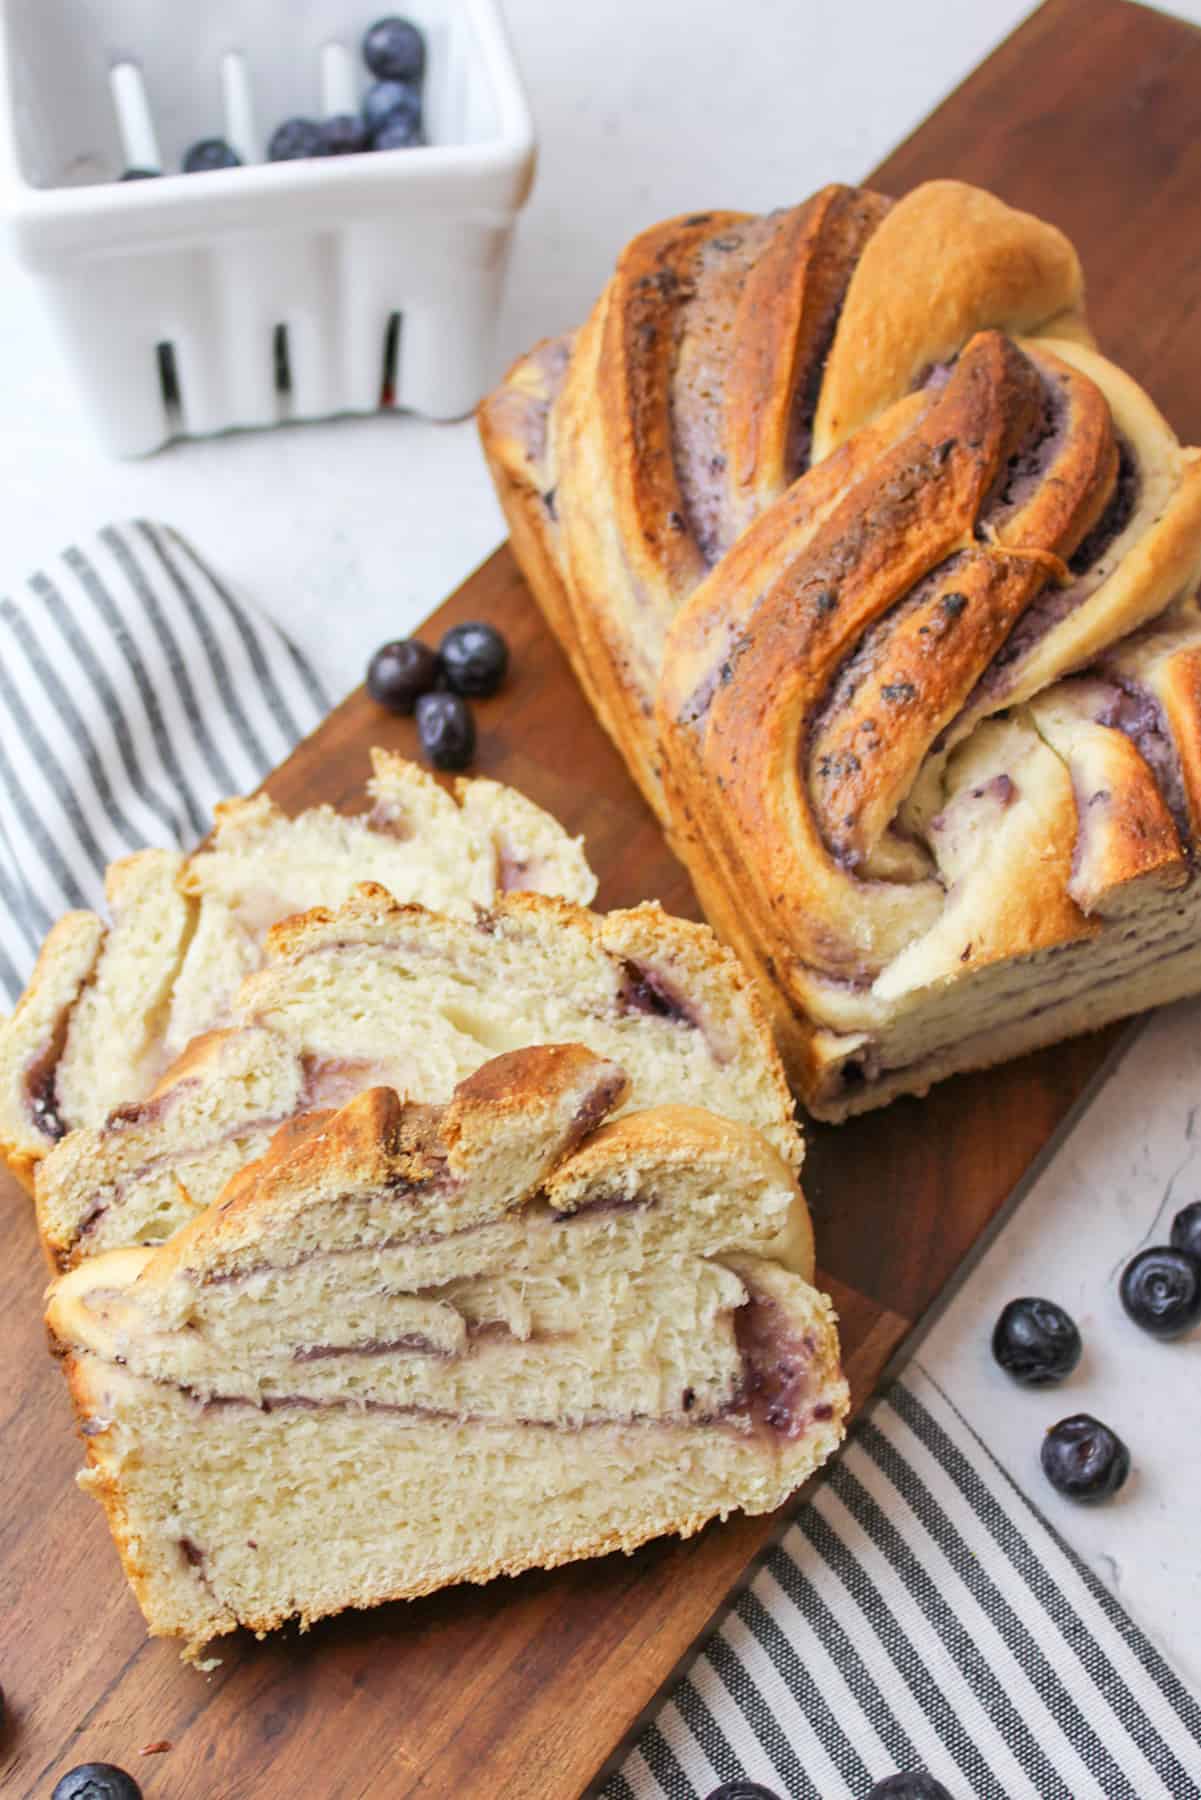
This blueberry cream cheese babka is a simple bread recipe that brings flavor and color to every slice. Filled with a sweetened blueberry cream cheese spread. Every soft and fluffy slice is perfect for snacking.
Recipe: $2.32 | Per Serving: $0.23 | Servings: 10 slices

I love blueberry recipes with cream cheese. Something about that rich and tangy flavor from the cream cheese pairs wonderfully with the sweet and tart cooked blueberries.
You're going to love how easy this blueberry cream cheese bread is to make. You may even be impressed by how fast it disappears once you start slicing it up and serving it to the family. This is one bread that's hard to resist!
For a regular bread recipe that you're going to love, check out my 5 Ingredient White Bread Recipe. This babka was actually inspired by it when I served it up with some Sugar Free Blueberry Jam.
For more delicious blueberry recipes, be sure to check out our Small Batch Blueberry Muffins, Blueberry Cream Cheese Scones, and Blueberry Sour Cream Coffee Cake.
Jump to:
🍯 Why This Recipe Works
- It's great any time of the day. This recipe has a sweetened cream cheese and blueberry filling to help counter any tartness so that every bite is perfectly sweet and perfect for breakfast, dessert, or simply snacking on throughout the day.
- It's good warm and cold. Eat this blueberry cream cheese swirl bread warm from the oven or chill it in the fridge for a refreshing treat on a hot summer's day.
- It's not too sweet. The flavors are subtle but wonderful. The chewy crust, soft interior, and blend of flavors swirled about are all so perfect, but nothing is too sweet, so it's great for toasting and adding toppings to or eating as is too.
🥘 Ingredients

Ingredient Notes:
Active dry yeast- Use yeast to help the bread dough expand and rise. Yeast adds a great amount of flavor too!
Water- Used to moisten the dough. Make sure that it is warmed to 110F to activate the yeast. Too hot will kill the yeast, and too cold won't get it to work properly.
Cream cheese- You will need some softened cream cheese for the filling. This is what adds richness and tangy flavors to every slice.
Blueberry jam- Use your favorite blueberry jam or preserves for the blueberry filling. You can use homemade or store-bought filling.
For specific ingredients and measurements, please see the recipe card below.
🔪 Instructions for Blueberry Cream Cheese Babka

Step 1: Whisk together the flour, yeast, and salt in a mixing bowl (Image 1).
Step 2: Add in the water, canola oil, and sugar (Image 2).
Step 3: Stir together the dough mixture until shaggy (Image 3).
Step 4: Then turn it onto a clean counter and knead it for about 10 minutes until it is smooth and elastic (Image 4).

Step 5: Place the dough into a greased bowl and cover (Image 5).
Step 6: Let rise for about an hour until doubled in size (Image 6).
Step 7: Add the filling ingredients to a mixing bowl (Image 7).
Step 8: Cream together until well mixed (Image 8). Set aside.

Step 9: Turn your proofed dough out onto a lightly floured surface (Image 9).
Step 10: Roll out your dough until it reaches a rectangle size of about 10 inches by 12 inches, if not bigger (Image 10).
Step 11: Spread the filling over the bread rectangle, leaving an inch of space along the edges (Image 11).
Step 12: From one of the long ends to the other, roll the dough tightly into a log. Pinch the seam along the side of the log to help hold them in place (Image 12).

Step 13: Using a sharp knife, slice down the center of the log making it into two strands (Image 13). Keep one end uncut so that the strands are connected on one side. If desired.
Step 14: Braid the two strands together by lifting one, placing it over the other, and repeating until completed. Pinch the ends to hold them in place (Image 14).
Step 15: Pick up the braided blueberry bread and place it in a greased bread pan with the braid on top and the ends tucked underneath (Image 15). Cover with plastic wrap and allow to double in size in a warm place. (about 1 hour).
Step 16: Preheat your oven to 350 degrees F. When the bread has doubled in size, remove the plastic wrap and then bake the bread in the oven for 40-45 minutes (Image 16).
Step 17: Allow your bread to cool in the pan for 10 minutes before removing and placing it on a wire rack to cool completely.
Slice the bread and serve as desired.
🍴 Recipe Tips
- Filling Placement- Applying the cream cheese filling can be tricky as it tends to slide around. You can adjust the thickness of the filling to your preference, but thicker spread may make it challenging to roll and braid the dough.
- Slicing Technique- To prevent the filling from shifting excessively, keep the bread uncut or pinched at one end when slicing it in half. This helps maintain control as you fold each strand over during braiding.
- Bread Placement- When placing the dough in the bread pan, tuck the ends of the bread underneath the braided section. This ensures that only the attractive braided top is visible, with the ends neatly hidden.
🍞 How to Knead Bread Dough
- Hand Kneading Technique- Kneading dough by hand is my preferred method because it's less likely to overwork the dough. Start by placing the dough on a floured surface and use both hands to roll it into an oval shape. Then, fold one half over the other and repeat the process.
- Smoothing and Rotating- As you knead, gently press and roll the dough to smooth it out. Rotate the dough about 90 degrees every few times to ensure all parts are worked evenly.
- Signs of Completion- A smooth and elastic texture indicates the dough is ready. It typically takes about 10 minutes by hand, but can be quicker with practice.
- Check for these signs:
- The dough should resist tearing when stretched, showing elasticity.
- When poked with a finger, the dough should bounce back and fill in the indentation, indicating proper elasticity.
- Check for these signs:
🥖 How Long to Proof Dough
- Proofing Dough Time- The time needed to proof dough can vary due to factors like weather, temperature, and yeast activity. While it typically takes 1 to 3 hours, some doughs may proof faster.
- Goal-Oriented Proofing- Rather than focusing on a specific time, aim for doubling in size as the key indicator of proper proofing. This ensures optimal texture and flavor development.
- Proper Environment- To create an ideal proofing environment:
- Cover the dough with greased plastic wrap to prevent drying.
- Place it in a warm location. Preheating the oven to 200°F for a few minutes, then turning it off, creates a warm, draft-free space.
- Other options include a closed microwave or oven with only the light on, or a warm kitchen countertop on a sunny day.
💭 Recipe FAQs
After the bread has been completely cooled, I recommend keeping it stored in an airtight container in the fridge for up to 3 days. This will help to keep the filling fresh. You can always warm a few slices on a plate in the microwave if you decide you like it better warmed too.
Yes, you can freeze this bread recipe! After the bread has cooled, wrap it well in plastic wrap and then place in a gallon sized freezer bag or an airtight container for up to 4 months. Thaw on the counter at room temperature before slicing and serving.
If you don't have blueberry jam on hand but find yourself with blackberry, strawberry, or another flavorful variety, feel free to use them. I would try to stick with jams and preserves as they'll spread and mix easier than a jelly would.
❤️ More Delicious Bread Recipes
If you tried this Blueberry Cream Cheese Babka, please leave a ⭐️ star rating and share your feedback in the 📝 comments section below. I would truly appreciate it!
📖 Recipe
Blueberry Cream Cheese Babka
Ingredients
Bread:
- 2 ½ cups all purpose flour ($0.32)
- 2 ¼ teaspoon active dry yeast (one packet) ($0.38)
- 1 ½ teaspoon salt ($0.01)
- 1 cup warm water (about 110 degrees F) ($0.00)
- 3 Tablespoons vegetable oil ($0.13)
- 2 Tablespoons granulated sugar ($0.05)
Filling:
- 4 ounces cream cheese, softened ($0.93)
- ¼ cup granulated sugar ($0.09)
- ½ teaspoon vanilla extract ($0.01)
- ¼ cup blueberry jam ($0.40)
Instructions
- In a bowl whisk together the flour, yeast, and salt.
- Add in the water, oil, and sugar.
- Stir and knead for 10 minutes until smooth and elastic.
- Place in a greased bowl and cover. Allow to rise for about an hour or until doubled in size.
- Roll out dough onto a lightly floured surface and form a large rectangle about 10x12 (or bigger).
- In a mixing bowl cream together the filling ingredients until well mixed.
- Spread the filling over the flat bread, leaving a few inches of space along the edges.
- From one end of a long side, roll towards the other side, creating a tight log of rolled dough.
- Pinch the end seam together to hold it in place.
- Using a sharp knife, slice down the center of the log, making two strands and revealing the layers inside.
- Braid the two strands together by lifting one piece and placing it over the other and repeating, alternating sides as you go. Once finished pinch the ends of the braid together to hold them in place.
- Pick up your braided dough by the center and lift it into a greased 8x4 bread pan. Place the ends of the braid underneath so that the pretty center can rest at the top.
- Cover with plastic wrap and allow to rise until doubled (about an hour).
- Preheat your oven to 350 degrees F.
- When the bread has risen, bake in the oven for 40-45 minutes.
- Allow to cool in the pan for 10 minutes before transferring to a wire rack to cool completely.
- Slice and serve.
Notes
- Adjust filling thickness for preference; thicker spread can make it harder to work with.
- Prevent sliding by keeping bread uncut when slicing dough in half.
- Tuck dough ends under when placing in the pan for a tidy appearance.
- Use various jams or preserves if you don't have blueberry jam.
- Store cooled bread in an airtight container in the fridge for up to 3 days.
- Freeze the bread wrapped in plastic and placed in a sealed bag or container for up to 4 months. Thaw before slicing and serving.





Deborah Rapaport says
Can you show me a diagram of how you braid the dough and feel it not good with bread Ive never made bread before but this sounds delicious. Thank you Deb Rapaport
Nicole says
After rolling the dough into a log and slicing it down the center, you have two "logs" of dough in front of you (as seen in the blog step by step photos). The two logs are placed side by side, with the ends at the top being pinched together to better hold. Then the two strands/logs are literally placed one over the other to create a braided look. The ends are pinched once finished, and it is then placed into the loaf pan. I don't have process photos of lifting the dough during the braid, but I hope that description helps.